Facebook Messenger Bot Tutorial: Step-by-Step Instructions for Building a Basic Facebook Chat Bot
First there were desktop software products, then everything moved to the web. Then there were email-based products and even SMS-based ones. The latest craze in software interfaces is messenger bots, and Facebook has the largest chat platform by a long shot.
In this tutorial, I’ll show you how to build your own Facebook Messenger Chat Bot in python. We’ll use Flask for some basic web request handling, and we’ll deploy the app to Heroku.
Let’s get started.
Step #1: Create a Working Webhook Endpoint
We’ll get into the meat of sending and receiving messages in a bit, but first you need to have a working endpoint that returns a 200 response code and echoes back some information in order to verify your bot with Facebook.

First, git clone the Github repository that I set up for this project:
git clone git@github.com:hartleybrody/fb-messenger-bot.git
Then, cd into it and install python dependencies:
mkvirtualenv test-bot

pip install -r requirements.txt
For simplicity, we’ll deploy this to Heroku, but you could also deploy this Flask web app to any server you have access to.
Assuming you already have the Heroku CLI Toolbelt installed, you can run
heroku create
to get your new application setup.
We’re also using Heroku’s convention for the Procfile to tell it how to run the app, but you could set this up on your own server with something like nginx in front of one or more gunicorn processes.
To verify that Heroku can run things locally on your machine, start your local server with:
heroku local
Then, in your browser, visit http://localhost:5000/ and you should see “Hello world”.

Kill the local server with Ctrl+C. To deploy this endpoint to Heroku
git push heroku master
And to open it in your browser
heroku open
Now you’ve got a “working” webhook URL that you can use to setup your bot. Make sure you grab the full https://*.herokuapp.com URL from your browser since we’ll need it in a bit.
Step #2: Create a Facebook Page
If you don’t already have one, you need to create a Facebook Page. The Facebook Page is the “identity” of your bot, including the name and image that appears when someone chats with it inside Facebook Messenger.
If you’re just creating a dummy one for your chatbot, it doesn’t really matter what you name it or how you categorize it. You can skip through most of the setup steps.
In order to communicate with your bot, people will need to go through your Page, which we’ll look at in a bit.
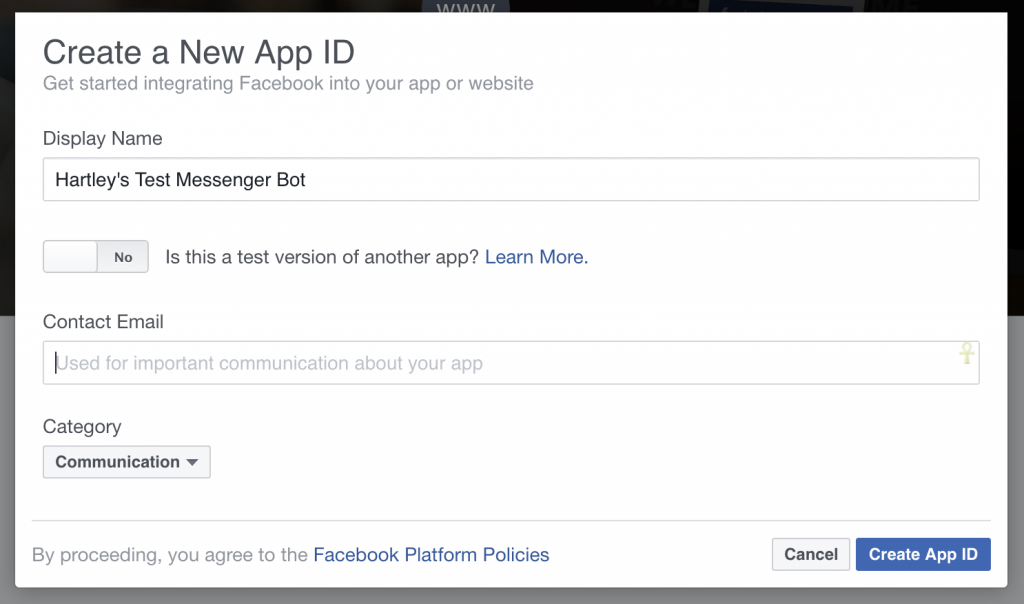
Step #3: Create a Facebook App
Go to the Facebook Developer’s Quickstart Page and click “Skip and Create App ID” at the top right. Then create a new Facebook App for your bot and give your app a name, category and contact email.
You’ll see your new App ID at the top right on the next page. Scroll down and click “Get Started” next to Messenger.

Step #4: Setup Your Messaging App
Now you’re in the Messenger settings for your Facebook App. There are a few things in here you’ll need to fill out in order to get your chatbot wired up to the Heroku endpoint we setup earlier.
Generate a Page Access Token
Using the Page you created earlier (or an existing Page), click through the auth flow and you'll receive a Page Access Token for your app.

Click on the Page Access Token to copy it to your clipboard. You’ll need to set it as an environment variable for your Heroku application. On the command line, in the same folder where you cloned the application, run:
heroku config:add PAGE_ACCESS_TOKEN=your_page_token_here
This token will be used to authenticate your requests whenever you try to send a message or reply to someone.
Setup Webhook
When you go to setup your webhook, you'll need a few bits of information:

- Callback URL - The Heroku (or other) URL that we setup earlier.
- Verification Token - A secret value that will be sent to your bot, in order to verify the request is coming from Facebook. Whatever value you set here, make sure you add it to your Heroku environment using
heroku config:add VERIFY_TOKEN=your_verification_token_here - Subscription Fields - This tells Facebook what messaging events you care about and want it to notify your webhook about. If you're not sure, just start with "messages," as you can change this later
After you’ve configured your webhook, you’ll need to subscribe to the specific page you want to receive message notifications for.

Once you’ve gotten your Page Access Token and set up your webhook, make sure you set both the PAGE_ACCESS_TOKEN and VERIFY_TOKEN config values in your Heroku application, and you should be good to go!
Step #5: Start Chatting with Your Bot
Go to the Facebook Page you created and click on “Message” button, next to the “Like” button near the top of the page. This should open a message pane with your Page.

Start sending your Page messages and the bot should reply!
To see what’s happening, check the logs of your application
heroku logs -t
You should see the POST data that Facebook is sending to your endpoint whenever a new message is sent to your Page’s bot.
Here’s an example JSON POST body that I got when I sent “does this work?” to my bot
        {
            "object":"page",
            "entry":[
                {
                    "messaging":[
                        {
                            "message":{
                                "text":"does this work?",
                                "seq":20,
                                "mid":"mid.1466015596912:7348aba4de4cfddf91"
                            },
                            "timestamp":1466015596919,
                            "sender":{
                                "id":"885721401551027"
                            },
                            "recipient":{
                                "id":"260317677677806"
                            }
                        }
                    ],
                    "time":1466015596947,
                    "id":"260317677677806"
                }
            ]
        }
By default, the bot should respond to everything with “got it, thanks!”
Step #6: Customize Your Bot's Behavior
Here’s where we finally start to dive into the code.
There are really only two key parts to a messaging bot: receiving and sending messages
Receiving Messages
We handle incoming messages starting on line 24 inside app.py, in our `webhook()` view function.
First we load in the JSON POST data that’s sent to the webhook from Facebook whenever a new messaging event is triggered, usually when someone sends a message to our Page.
Then we loop over each entry – in my testing experience, there’s only ever been one entry sent to the webhook at a time.
Then we loop over each of the messaging events. Here, there may be several messaging events.
In step #4, we told Facebook what message types we want our webhook to be notified about. If you followed my advice, then our endpoint will only receive “message” events, but we could also receive delivery confirmations, optins and postbacks (more on those later). I left some code in place for detecting those other types of messaging events, but I don’t actually handle them.
The messaging event that will be most useful to most applications will be the “message” event, meaning someone has sent your Page a new message. I wrote some basic code to handle that event, parsing out the sender’s ID, and simply responding back to them.
Sending Messages
In order to send a simple text message, you only need two things:
- the recipient's Facebook ID
- the text of the message you want to send
I’ve created a simple send_message() function that automatically hits the Facebook API and sends those pieces of information.
Remember that the request is authenticated using the PAGE_ACCESS_TOKEN environment variable that we got back in step #4.
There are many more complex message types you can send, including messages with images and buttons. More information on those message types here.
Important to note is the ability to send a “postback” button in a message. These are essentially buttons that, when tapped by a user, send a postback messaging event to your webhook.
This essentially allows users to “press buttons” in your app, all while inside Facebook Messenger. You could use this for placing an order, confirming a request or lots of other things.
Whenever a user taps a postback button, your webhook is notified and can perform any sort of subsequent follow-up action necessary.
Step #7: Submit Your App to be Reviewed
While you’re testing your bot, only you and other Page admins can message with the bot directly. You have to go through a review process before your bot is open to the world, ready to chat with anyone.
Facebook seems to be very thorough in their review process, and with good reason. The code for a messaging bot runs on your own servers and could change at any time, without Facebook knowing.
They seem to be trying hard to make sure you’re a good actor, and not submitting a simple dummy app to get approved, only to change it to some spam bot down the road.
Obviously, they could still revoke your API access tokens if you did that, but they’d rather not have any abuse on the Messenger platform at all.
Go back to your Messenger App Settings page that we used in Step #4. Scroll down to “App Review for Messenger” and click “Request Permissions.”

Request the permissions that you need, and then you’ll be taken to the “Review Status” page. This page requires a ton of information to ensure that developers aren’t going to abuse the platform.
It requires you to
- check several boxes verifying that you've read their policies and guidelines
- promise you won't engage in unsolicited, outbound messaging
- describe how you're going to interact with users through your bot
- provide a test user that the review team can use to interact with your bot
- upload a screencast of you interacting with your bot via Messenger
- have a privacy policy
- verify that you're explaining the bot and setting expectations with users
On this page, you can also ask to be granted extra information about users, like their email or profile information.
Then it all goes to the Facebook review team to sign off and give you full access to the Messenger platform. More information about the approval process here.
Even if you don’t intend to go all the way through the review process, hopefully you’ve learned a thing or two about how to build a simple chat bot for Facebook Messenger.
PS: I decided to learn the Facebook Messenger Bot platform in an afternoon and write this post after David Markovich told me he didn’t think I could learn it that quickly to work with his Messenger Bot Consulting Business. Showed him wrong! 😜