How to Set Up WordPress for Maximum Awesomeness
When most people set up their personal WordPress blog, they’ll pick a theme, throw the Google Analytics tracking code on it, and stop there. And while WordPress gives you a decent website out of the box, there’s a lot left to be desired.
![]() With an extra hour or two of setup, you can have a well-optimized, secure blog that pulls in new visitors and keeps out intruders. Most of these things are one-time setups that you won’t have to think about again.
With an extra hour or two of setup, you can have a well-optimized, secure blog that pulls in new visitors and keeps out intruders. Most of these things are one-time setups that you won’t have to think about again.
These are the tricks I’ve learned after setting up dozens of WordPress blogs for myself and for friends – some tiny niche sites and some massive content destinations attracting 10k+ visitors a day.
Before you get started, make sure you’re running the latest version of WordPress by going to Dashboard > Updates and checking for any upgrades.
Since the WordPress software is the most used CMS on the internet, it’s a huge target for hackers and spammers, and new security updates come out frequently. You wanna make sure you’re starting with the latest, most secure version.
Optimize for Search Engines
You want your website to be easy for search engines to find, crawl and understand. Despite its reputation, SEO isn’t all that scary. A little bit of structural work up-front will help your content rank more highly and drive search traffic to your blog, forevermore.
URL Structure The first thing you need to do is change the default permalink structure that WordPress comes with. Unless your content is really time-sensitive, you probably don’t want all those date numbers pushing the keyword-rich part of your URL further to the right.
Search engines generally give preference to pages where keywords appear closer to the left in both the URL and the page title (which we’ll adjust in a minute). Go to Settings > Permalinks and make sure you choose the “Post Name” permalink option that doesn’t add the unnecessary year and month numbers.

Now that you’ve got that setting out of the way, you’re going to install two of the more popular WordPress plugins: All in One SEO Pack and Robots Meta.
All in One SEO Pack
Once you've installed the All in One SEO Pack, go to Settings > All in One SEO and make sure "enabled" is selected. There are a lot of options in here and most of the defaults are pretty good, but there are a few things you should consider:
- Home Description This is the snippet of text that someone sees when your site shows up in search engine result pages (SERPs). Use it to briefly explain your site (160 characters max) in a way that entices people to check it out.
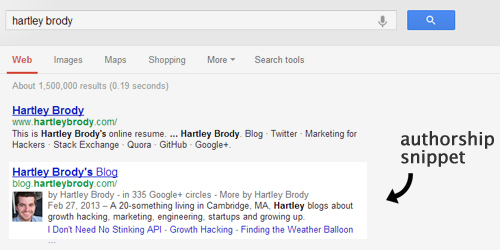
- Google Plus Profile Sitewide Default If you have a Google+ account, you can link your site's content to your Google+ account and benefit from authorship snippets in search results. If you're writing a personal blog where you're the only author, this is a great idea.
- noindex for Categories, Archives and Tags These pages will almost always create duplicate content issues for your site. Unless you really use Categories or Tags to create special sections of your site with unique content that doesn't show up on your homepage, you probably don't want these to be indexed by search engines.
The other cool thing that All in One SEO Pack does is provide additional space for you to provide a custom meta description and title tag for each one of your posts.
If you go to Posts > Add New and click “Screen Options” at the top, make sure “All in One SEO Pack” is checked, and then you can scroll down to add that information to each article.

You should consider updating the “Title” – or page title tag – for each post. This can, and often should be, different than the actual title of the article that visitors see on your blog. The title tag has a big impact on a post’s ranking in search results, so it’s important to pick a good, keyword-rich title.
The “Description” – or meta description – is the text snippet that shows up in SERPs for each post, just like what you filled out for the Home Description earlier for your homepage. It’s also the preview text that Facebook grabs when someone shares a link to your content. Unlike the title, the meta description has no impact on search rankings for an article.
If you’d like to learn a bit more about things you can do on your site to optimize it for search engines (so called “On-Page SEO”) check out this awesome article by SEOmoz.
Robots Meta
The Robots Meta plugin gives you tons of control over how search engines crawl and index your content. These can get a bit advanced, but we'll just set up some sensible defaults. Once you've installed the plugin, go to Settings > Robots Meta and make sure the following options are checked:
- Prevent Indexing
- This site's search result pages
- All Admin Pages
- Author Archives
- Date-Based Archives
- Category Archives
- Tag Archives
- Archive Settings
- Disable the author archives (only if your site is a single-author site)
- Disable the date-based archives
- Redirect search results pages when referrer is external
This should take care of all of the major duplicate content issues that WordPress sites often face. If you’re a particularly savvy webmaster, you can also integrate the plugin with your existing Google Webmaster Tools account. If not, not worries.
Build an Engaged Following
Now that your site is well-optimized for search engines, you want to think about how you can start to retain visitors, and keep them coming back to see your latest content. The easiest way to do this is to start building a following of email and social subscribers.
Set Up a Free Email Subscription Service
It's common to think that it's not worth setting up an email distribution list, but you'd be surprised by how many people like to get subscriptions in their inbox. Maybe it'll just be your mom at first, but over time, that email list will grow if you promote it well. Plus, it's surprisingly easy to set one up.
To get started, create a free account with MailChimp and then create an RSS-Driven campaign. Just tell them where your blog’s RSS feed is (by default, it’s <blog_domain>.com/feed/), pick a cool email template, and then it’ll automatically send out an email to your subscribers whenever you publish a new article.
Once you’ve gotten that configured, make sure you make it easy for readers to give you their email address and subscribe to your content. MailChimp has their own WordPress plugin that lets you put a “subscribe” box in the sidebar of your website – just like the one you see in my sidebar, above.
You should also build out a dedicated “blog subscription landing page” on your site that you can send visitors to if they want to subscribe. This gives you more room to explain a bit about the content you write, how frequently you post, and what the visitor should expect by subscribing. I’ve written about effective landing pages before, so check that out for more info.
Optimize for Social Sharing
If you're already active on Twitter and Facebook, you probably don't need to build out a dedicated Facebook page or Twitter profile just for your blog. If you're only writing articles once or twice a week, you should simply encourage your blog's visitors to subscribe to your updates on Twitter or Facebook, so that they'll also see later articles you publish.
If you want to make sure your content looks good when it’s shared on social media, you might consider adding Facebook Open Graph tags or Twitter Cards to your post. These are special markup tags that ensure both social networks can understand your posts and provide proper previews when people share links to your content. There are plugins can help with that, if you’re interested (Facebook, Twitter).

Security & Spam
There are two broad classes of undesirables on the internet – hackers and spammers. As mentioned earlier, WordPress sites are widely targeted by hackers and spammers because of how common the software is.
Even if you’re just creating a small site in a tiny corner of the internet, there are all sorts of robots spidering the web and looking for sites with vulnerabilities. Don’t think you’re too small to be a target, you will be.
Fortunately, you can set up some basic, simple defenses that’ll go a long way to keeping your site safe and spam-free.
Keeping out the Hackers
If an attacker is able to login to your dashboard, that's obviously a really bad thing. While they could do something dramatic like delete all your articles or post a bunch of spam on your blog, they're more likely to do something subtle to try and remain undetected.
They might add some links to the footer of your site, or change the content of older posts. Don’t assume that you’ll notice if your site is compromised. Make sure your dashboard has rock solid defenses by installing the following two plugins: LimitLoginAttempts and Google Authenticator.
LimitLoginAttempts is a crucial WordPress plugin that does exactly what it says – it prevents attackers and robots from trying to repeatedly guess your password, a common technique known as brute forcing.
If the plugin detects too many failed login attempts from a particular computer, the plugin will automatically block that machine from trying to login again for a set period of time. The defaults on this are pretty good, but you can make them stricter by going to Settings > Limit Login Attempts.
Installing Google Authenticator will add an extra field to the login screen making it even harder for a hacker to get in. In order to login, you need to provide a username, password AND a random code generated by an app on your phone. This means that even if someone were to guess your password, they still wouldn’t be able to login unless they also had access to your phone.

This is a super secure login method known as two factor authentication and it’s a no-brainer to add another layer of security.
With those two plugins installed, it’s going to be nearly impossible for someone to gain unauthorized access to your blog.
Keeping Out Spammers
The other group of undesirables are the spammers. If you don't put any anti-spam measures in place, you'll end up with hundreds of useless blog comments that link back to spammy websites, which are a huge pain to deal with.
By default, WordPress ships with Akismet, which is a basic spam prevention service that’ll flag comments that seem spammy and let you review them before posting them on your site.
The alternative that I prefer is to use the Facebook comments plugin. This requires visitors to be logged into Facebook in order to post a comment, and ties their identity to their message. While it’s not explicitly designed to reduce spam, I haven’t seen a single spam comment since I switched my blog over to it a few years ago.
For sites that prefer to allow anonymous comments, this might not be the best option, and you might consider Disqus instead.
Hosting & Monitoring
At this point, you’ve set up a well-optimized website that’s ready to grow a loyal audience over time. Hackers and spammers are no match for your defenses.
But even if all of the software runs properly, some things are out of your control. Servers crash and files get corrupted. Networks go offline and can bring down your website. Here are a few tips to handle common problems every website will run into eventually.
Automatic Nightly Site Backups
Just like backing up your music and movies, you want to keep a fresh copy of all your website's content stored in a safe place. The best plugin I've found for this is WP DB Backup.
Once you install the plugin, go to Tools > Backup and go to the “Schedule Backup” section. Make sure you schedule the backup for “Once Daily” and have it emailed to yourself, then click “Schedule Backup.” By automating nightly backups, you’ve just proven yourself smarter than the vast majority of website owners.
Now, if your site every crashes or gets hacked, you’ll always have a spare copy of your data that’s no more than a few hours old, making it really easy to get your content back up and your site running again in no time. Without a fresh backup, you stand to lose a lot.
Free Website Monitoring
Websites go down for all sorts of reasons. I cancelled my credit card when I lost my wallet a few years ago, and forgot to update my billing information with my hosting provider. After a few failed charge attempts, they took my websites offline.
Fortunately, I had set up free website monitoring from Pingdom, so I was notified via text message within a minute of my site going offline. Pingdom checks your website every minute from data centers around the world and notifies you as soon as something goes offline.
You’ll know as soon as there’s a problem and can take steps to get your site back online quickly. In my case, I updated my credit card information and my sites were back up after about 5 minutes of downtime. Not bad!
Totally Managed Hosting
If you're looking for a secure, reliable, fully-managed WordPress hosting service, I switched to WP Engine about a year ago and haven't regretted it at all. They're the experts on keeping a WordPress site running fast and secure.
So far this year, my blog has only had 20 minutes of downtime (99.98% uptime) and is averaging less than half a second page response times (351ms), which is pretty good considering I didn’t have to lift a finger to manage any of that. They also gracefully handle huge traffic spikes if (…when :)) an article becomes popular.
You give up some control versus hosting and managing a blog yourself, but I’ve found the peace of mind and reliability to be worth it. Plus migrating your existing site over to them is super easy. Definitely worth checking out.
Once you’ve gotten all of this set up, the final step is to start writing! Growing a blog audience takes a bit of patience and consistency, but it’s a great investment and can be really rewarding.
If you’re thinking about blogging to grow interest in a product or business, you should check out my eBook called Marketing for Hackers. It’s a step by step guide to turn your weekend project into paying customers.
